Yet another K3s cluster on Raspberry Pis

This is a continuation of my previous post where I showed how I hosted a ghost blog running on my spare Raspberry Pi at home. Now it's time to do a massive upgrade! Instead of paying the extra dollars to host the blog on the cloud, why not have it on my own private Kubernetes cluster. Of course I would still be paying the extra dollars for the added electricity costs but its definitely worth the fun.
Let's first take a look at what additional hardware we need.
Required hardware
- At least 2 Raspberry Pis
- PoE HAT for every Raspberry Pi
- 5-Port Network Switch with 4-Port PoE
- Bundle of 6 inch Ethernet cables
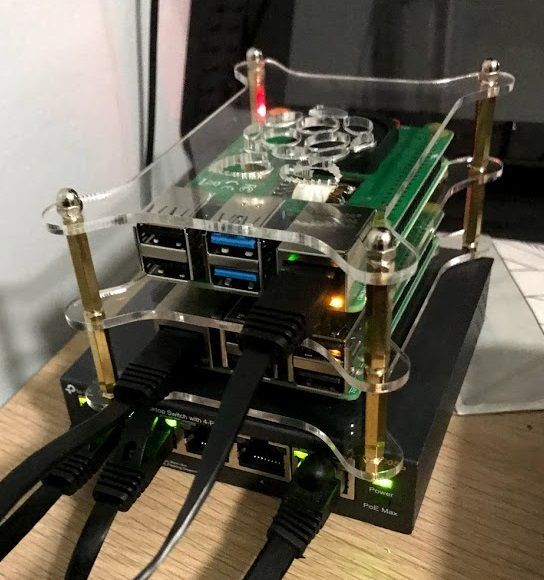
- Casing for the Raspberry Pis stack
Setting it up

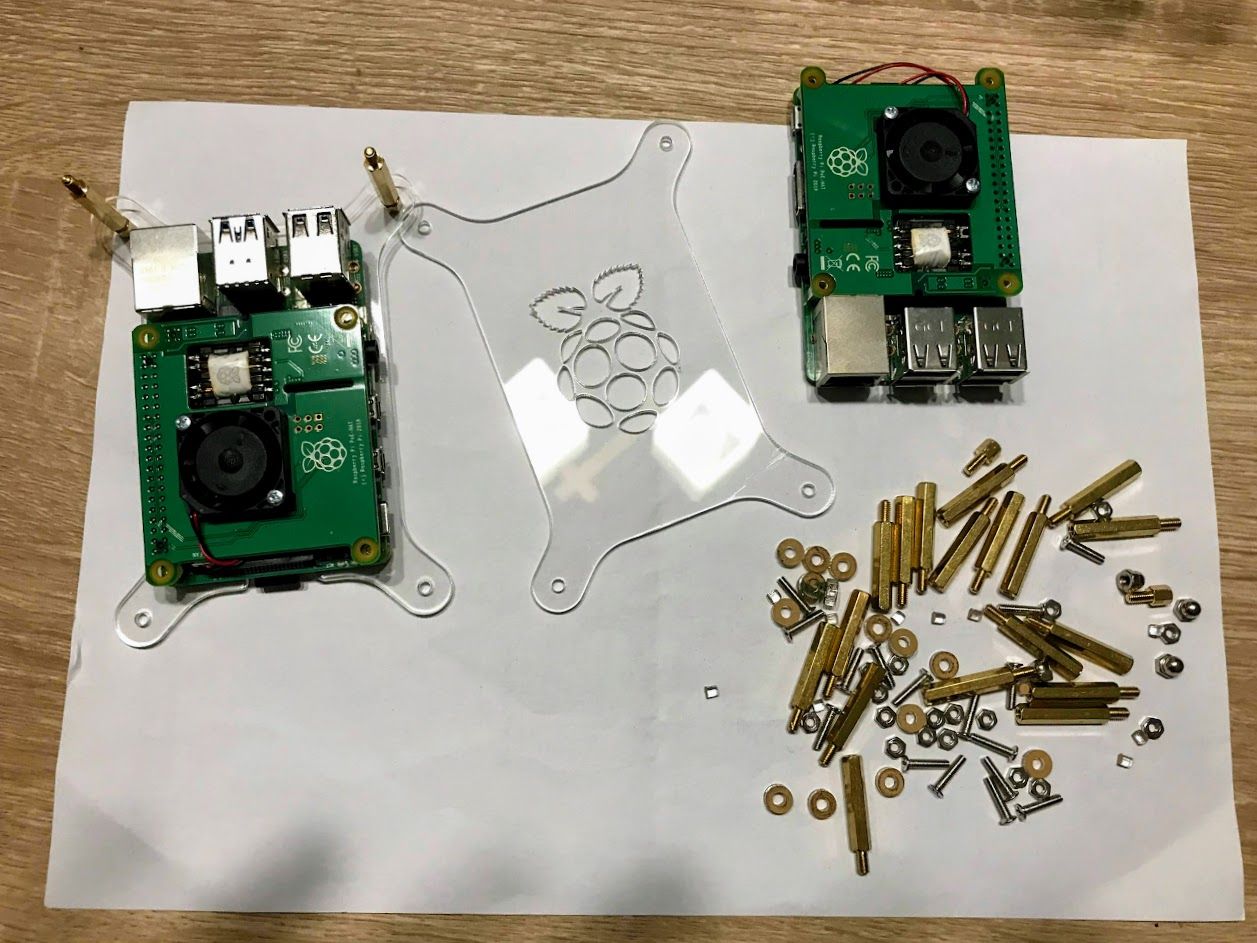
The whole assembling process should take you less than an hour. No soldering, just simple screwing. Another setup option if you don't want to use PoE would be to have an external power bank that gives power to the Rasberry Pis.

For more details on Raspberry Pi cluster setup, I would highly recommend following Jeff Geerling's video series. Now let's move on to getting things setup inside the Raspberry Pis.
Installing K3s onto Raspbian Lite
Since I don't need to use any GUI when interacting with the Raspberry OS, I used a Lite version of the Raspbian OS.
Flash SD card
So first thing we need to do is to flash the SD card for each Raspberry Pis using balenaEtcher or the new Raspberry Pi Imager (recommended).
Enable SSH and boot up
Create empty file ssh in boot partition to enable SSH. Remember to do this before booting up your Raspberry Pi!
If you want to be lazy like me and not having the need to type in the password every time you SSH into your Raspberry Pi, do the following to copy the keys over once your Raspberry Pi is up and running.
ssh-copy-id pi@raspberrypi.localInstall K3s with k3sup
K3s is a lightweight Kubernetes and it is highly recommended to use it for resource constrained hardware like the Raspberry Pis. Installing K3s is super easy when you use k3sup. It just takes a few minutes! Download it here. Once installed, run the following command to install k3s onto the server ip as the master node.
k3sup install --ip $SERVER_IP --user piFor every worker node that you would like to be part of the cluster, run the following command.
k3sup join --ip $WORKER_IP --server-ip $SERVER_IP --user piVerify the status of the nodes. Make sure they are in Ready state.
kubectl get node -o wideDeploying Ghost blog onto the cluster
Now let's get to the various kubernetes objects that we will be creating. We will go through each component that is needed when a HTTP request is being made to the blog. For some of the components, I'm using another tool called arkade to super easily deploy the apps onto the cluster in my Raspberry Pi.
NGINX Ingress Controller
Firstly, we need to install an ingress controller to allow external access to the services in our cluster.
arkade install ingress-nginxOn checking the status, you will notice that the external-ip is not yet set because there is no network load balancing implementation built-in for bare metal cluster.
NAME                       TYPE           CLUSTER-IP     EXTERNAL-IP
ingress-nginx-controller   LoadBalancer   10.43.157.88   <none>
Bare Metal Load Balancer
Since this is a bare metal cluster, we cannot rely on the cloud to implement network load balancing. I used MetalLB which performs Layer 2 address discovery on the local network to make sure that all the nodes in the network are aware of an external IP address. Run the following to install MetalLB into your cluster.
kubectl apply -f https://raw.githubusercontent.com/metallb/metallb/v0.9.3/manifests/namespace.yaml
kubectl apply -f https://raw.githubusercontent.com/metallb/metallb/v0.9.3/manifests/metallb.yaml kubectl create secret generic -n metallb-system memberlist --from-literal=secretkey="$(openssl rand -base64 128)"
Create a new file ingress.yaml and add the following configmap as shown below. Note that the external IP can be in the range determined by us. Because my network is behind a router, I have to explicitly set one so that my router could do a port forwarding directly to that IP address, which is 172.16.0.200 as shown below.
apiVersion: v1
kind: ConfigMap
metadata:
  namespace: metallb-system
  name: config
data:
  config: |
    address-pools:
    - name: default
      protocol: layer2
      addresses:
- 172.16.0.200Now that we have configured external access (with load balancing) into our cluster, let's take a look at the ingress setup.
cert-manager
Since my blog is hosted with TLS, I would need to make sure my domain is issued with a valid certificate. Using cert-manager does the job by providing automated issuing of TLS certificates.
arkade install cert-managerIngress rules
From this point onward, I'll be installing the rest of the components under a custom ghost namespace.
kubectl create namespace ghostThe ingress rule for the ghost blog is simple - Allow requests from my domain that will access the service (named ghost) hosted on port 80. Add the following Ingress rules to ingress.yaml that we've created earlier on.
apiVersion: networking.k8s.io/v1beta1
kind: Ingress
metadata:
  name: ghost-gateway
  namespace: ghost
  annotations:
    cert-manager.io/cluster-issuer: letsencrypt-prod
    kubernetes.io/ingress.class: nginx
spec:
  rules:
  - host: blog.zhijiahu.sg
    http:
      paths:
      - backend:
          serviceName: ghost
          servicePort: 80
        path: /
  tls:
  - hosts:
    - blog.zhijiahu.sg
secretName: ghost-tlsThe rule also specifies that the tls is required for the domain. Notice that we have annotations of cert-manager.io/cluster-issuer: letsencrypt-prod and a secret named ghost-tls This will tell the ingress controller to find a ClusterIssuer object and the secret when it is doing SSL termination. The secret object will be created by the cert-manager when it is issuing the certificate for the domain.
The following defines the configuration for the issuer where we are using letsencrypt as the certificate authority.
apiVersion: cert-manager.io/v1alpha2
kind: ClusterIssuer
metadata:
  name: letsencrypt-prod
spec:
  acme:
    email: z.jia.hu@gmail.com
    server: https://acme-v02.api.letsencrypt.org/directory
    privateKeySecretRef:
      name: letsencrypt-prod-private-key
    solvers:
    - http01:
        ingress:
class: nginxWe have finally defined everything needed to allow ingress to our services. Do the final step to apply the changes in your cluster.
kubectl apply -f ingress.yamlNow lets define the services that our ingress rule is allowing routes for.
Services and Pods
We will need to define 2 services, one for the actual ghost server and the other for mysql server.
Ghost
Create a new file ghost-service.yaml and add the following Service object. This service would be listening on port 80 and will route incoming requests to an available pod labelled app: ghost-app that is running on port 2368.
apiVersion: v1
kind: Service
metadata:
  name: ghost
  namespace: ghost
spec:
  type: ClusterIP
  ports:
    - port: 80
      targetPort: 2368
  selector:
    app: ghost-app
And again apply this to your cluster!
kubectl apply -f ghost-service.yamlThe deployment configurations next is the tricky part. Note that we are configuring ghost to use MySQL in the cluster. I've also configured it to store data like images into AWS S3 instead of the default /content/data folder. This would at least allow this blog to have some partial reliable persistent storage. I still have to rely on exporting the blog posts stored in MySQL out manually as a backup stored in my personal cloud storage.
I'm using my own ghost docker image zhijia/ghost-s3-for-pi which is configured with the s3 adapter. The AWS S3 and MySQL credentials are stored as Secrets, ghost-s3-secret and mysql-pass, in the cluster.
apiVersion: apps/v1
kind: Deployment
metadata:
  name: ghost
  namespace: ghost
spec:
  replicas: 1
  selector:
    matchLabels:
      app: ghost-app
  template:
    metadata:
      labels:
        app: ghost-app
    spec:
      containers:
        - name: ghost
          image: zhijia/ghost-s3-for-pi
          resources:
            requests:
              cpu: 100m
              memory: 256Mi
            limits:
              cpu: 300m
              memory: 512Mi
          env:
            - name: NODE_ENV
              value: production
            - name: database__client
              value: mysql
            - name: database__connection__host
              value: mysql
            - name: database__connection__port
              value: "3306"
            - name: database__connection__user
              value: root
            - name: database__connection__password
              valueFrom:
                secretKeyRef:
                  name: mysql-pass
                  key: password
            - name: database__connection__database
              value: ghost-db
            - name: url
              value: https://blog.zhijiahu.sg/
            - name: storage__active
              value: s3
            - name: storage__s3__accessKeyId
              valueFrom:
                secretKeyRef:
                  name: ghost-s3-secret
                  key: awsaccesskeyid
            - name: storage__s3__secretAccessKey
              valueFrom:
                secretKeyRef:
                  name: ghost-s3-secret
                  key: awssecretaccesskey
            - name: storage__s3__region
              value: ap-southeast-1
            - name: storage__s3__bucket
              value: ghost-zhijiahu

          livenessProbe:
            httpGet:
              path: /
              port: 2368
              scheme: HTTP
              httpHeaders:
                - name: X-Forwarded-Proto
                  value: https
            initialDelaySeconds: 10
            periodSeconds: 30
            timeoutSeconds: 1
Before applying this deployment, we need to first setup the service and deployment for MySQL.
MySQL
Similar to the service that was created for Ghost, we need to route requests to mysql server pods. Let's name this mysql-service.yaml
apiVersion: v1
kind: Service
metadata:
  name: mysql
  namespace: ghost
spec:
  ports:
    - port: 3306
  selector:
    app: mysql-app
  clusterIP: None
Apply the change!
kubectl apply -f mysql-service.yamlIn order to preserve the data even when mysql pods restarts, we need to configure the volumes to use Persistent Volumes.
apiVersion: v1
kind: PersistentVolumeClaim
metadata:
  name: mysql-pv-claim
  namespace: ghost
spec:
  accessModes:
    - ReadWriteOnce
  resources:
    requests:
      storage: 20Gi
Apply this to create a persistent volume claim. kubectl apply -f mysql-pv-claim.yaml
Now we will setup the deployment of MySQL to use the persistent volume, along with the setup of credentials.
apiVersion: apps/v1
kind: Deployment
metadata:
  name: ghost-mysql
  namespace: ghost
spec:
  selector:
    matchLabels:
      app: mysql-app
  strategy:
    type: Recreate
  template:
    metadata:
      labels:
        app: mysql-app
    spec:
      containers:
      - image: hypriot/rpi-mysql:5.5
        name: mysql
        env:
        - name: MYSQL_ROOT_PASSWORD
          valueFrom:
            secretKeyRef:
              name: mysql-pass
              key: password
        ports:
        - containerPort: 3306
          name: mysql
        volumeMounts:
        - name: mysql-persistent-storage
          mountPath: /var/lib/mysql
      volumes:
      - name: mysql-persistent-storage
        persistentVolumeClaim:
          claimName: mysql-pv-claim
Note that the credentials is retrieved from the same Secret mysql-pass that the ghost server is using.
Now we can apply both deployments of MySQL and Ghost.
kubectl apply -f mysql.yaml
kubectl apply -f ghost.yaml
And there you have it, if everything goes well, you should be seeing the nice looking casper-themed ghost blog when you visit your domain. :) And the cool thing is that the blog runs in a Kubernetes cluster on your Raspberry Pis.
In the next blog post, I'll talk about horizontal pod scaling!


